DIY Deck Cleanup and Demolition
- Zach
- Jul 25, 2021
- 5 min read
Early this spring I began the process of fixing and cleaning up the deck, which rolled into a major demolition project. The deck had a thick brown deckover-type paint on it that had faded, and it had lots of holes and deck boards that needed replaced. Here's how it looked as we inherited it.


Our deck is two tiered - made up of a large rectangle near the house that was surrounded by a lower level that was a step down. The lower level had bench seating around the entire edge. The top deck was in decent shape and still sturdy. However, the lower part was going to need some major work.While it provided some nice useable space in front of the four season room, the lower level was generally pretty unusable due to how narrow it was between the step and the bench. It didn't allow for any furniture and was mostly just a walk-through. Plus the step was just a short step down that you could barely see coming, which we were always telling people to watch out for fear of ankles breaking. It became clear this this was not a deck design that would work for us.


Cleaning the Deck
To clean the deck, I began by removing all the tables and furniture. I got out my power washer just to see what I could get up with that alone. It was removing the dirt and cleaning well, but wasn’t taking off much of the brown stain.

Once it was wet, I used a deck cleaner and scrubbed it into the wood. I only focused on the top level, because I wanted to see if it was even possible to strip the stain before tackling the entire thing. To do this basically you poor it into a five-gallon bucket, mix it with water and scrub away.


Once I covered the entire deck I hit it again with the power washer. This step took much more of the stain off, but it was still on pretty thick. I had used this product several times before and it had worked great. Honestly, I didn’t even have a power washer on my old deck and it would remove the stain with this step without needing to sand it off. This deck stain was on thick.

Sanding the Deck
Once the deck was dry, I got out our hand sander and began sanding the deck. This was going to be needed anyway because it was rough. The kids and I like to do everything barefoot and with hopes of a future swimming pool, I wanted the deck to be nice and smooth to prevent slivers. I started just to see what would happen with our little mouse sander and blew the motor in it. This is not a job for a mouse sander.

So I got out my other random orbit sander and bought some new sanding pads and went to work. This made a difference right away, but took some time. I looked into renting a bigger sander, but no luck at the hardware stores. It took a long time, but was improved. (Kiersten says if you're reading this, do yourself a favor and just rent the big sander for the day from Home Depot.)


Taking Down the Lower Level Deck - Demolition
Once I finished the top deck, I started looking at the lower level. In a couple of spots, I could step on it and break the wood. It had lots of possible sliver spots, and several pieces would be needed to be replaced. As we looked more closely into the lower part of the deck, we decided to just take it all down. We never used it for living space. Having two levels, the second level just wasn’t big enough in most places to have a table or sit and talk to a friend. Plus, eventually we will be doing a concrete patio that goes out to the future pool and felt like that would be a better use of this space.

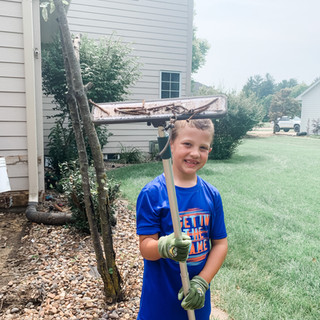
I was hoping taking down the lower deck would be a piece of cake. Unscrew a few screws and pile the wood up. However, most all of the screws simply stripped when I went to unscrew them or even broke. So, we started to knock out anything we could first with a sledge hammer. Worked great on the bench. Plus it was a great way for the kids and I to let out some energy and aggression.. as you can see:


After the bench, I bought a pry bar and began ripping up the floor boards. Basically, I found the base board, wiggled my pry bar in between and slowly popped up each board near the screws. This wasn’t hard, but just took time. Most of the boards were in no shape to reuse, but I saved a small pile for scraps for another project.


Once the top layer was off, I got to the hard part which was the base beams. They were heavy and sunk into the dirt. I could see original cement footings that helped hold it together on all the ends. I hit them hard with a sledge hammer hoping to move them a little bit, but they wouldn’t budge.
Swipe through below for some progress shots:


My pry bar did nothing as far as lifting the baseboards out of the ground. They were buried in into the ground and some were wet. We found three down spouts coming off our gutters that ended under the deck. This was good to find, because we need to get all of them further away from the house to save our foundation from more future water problems.

I needed to make the beams smaller so I got out my Sawzall and split them into smaller pieces. This worked and I was able to use the pry bar to get them out. A few of the boards just completely demolished into little pieces because they were rotten. Hank liked this part too.

Once that was cleared up all that was left was the wood boards connected to the house. These were bolted into the siding and I used a wrench to unscrew them. This was one of the hardest parts because they didn’t want to budge and several of them had very little space for me to work with. After the bolts came off, I used the pry bar and pulled the board off the house.
The Big Cleanup
One of the best decisions we made during this project was renting a dumpster. At our old house, we used one of those "bagsters" which worked great when we tore down our 10x10 deck, but this was a lot bigger. Kiersten took off a couple hours of PTO from work one day and we hauled all the wood into the dumpster trying to maximize every inch. It was tricky because every board had multiple big rusty screws sticking out. Hank got in on this part too and luckily we all avoided needing Tetanus shots!


Once finished I used a magnet picker upper (obviously a technical term) to get all the loose nails and metal that had been on the ground. I bought this a year ago when I got a new roof. It was scary to see what was in the grass after shingling. Our new house got a roof before we moved in too, and I was glad I had this tool because we found plenty of nails in our plant beds and grass after we moved in. Every time I went through the dirt and rocks, I picked up more nails.


It is demolished!
The deck is demo'd! The next step will be figuring out where to build some steps going down, railings, and pick deck stain.


Need a deck fix? Here's what we used:
*DISCLAIMER: This post contains affiliate links, which means that if you click on one of the product links, we may receive a small commission at no extra cost to you. Thank you for your support!