Deck Before and After! Plus, How to Clean, Strip, Paint and Finish an Old Deck
- Zach
- Jul 24, 2022
- 6 min read
I'm happy to be able to share our the latest big "before and after" change - our old deck that I finally was able to finish by cleaning, stripping and painting it! When we bought this house, we originally thought we would have to completely replace the deck. The boards were greatly worn and the previous owners had used a thick restore red paint to get more life out of it. The deck originally had two levels, which you may remember if you were following along with us last year when we shared how we demo'd the bottom level on this blog post and then added wood railings and steps to the main level. Read those blog posts first if you haven't already to get the full backstory.
The Deck Before, and Progress So Far
For those of you visual learners who like cliffs notes, here's the original deck:


And a few progress shots during demolition (read that blog here):


Then, we hired a friend to help add railings and steps (read that blog here):

We know the deck will be a key part of our backyard entertaining space with the pool in the future, and will have a lot of barefoot traffic, so we wanted to make sure it was secure and the floorboards were not hazardous. Several of the boards on the top had been replaced before the previous deck painting so it was in decent shape. And after adding the railings and steps, we felt we could buy a lot more time before total replacement if we refinished the deck.
Cleaning, Sanding and Painting the Deck
We needed to wait about 6 months after the railings and steps were put on to let the pretreated lumber air out before finishing it. So this spring it was time to try and clean, sand, and paint the deck. Problem is, our spring weather was so rainy so it took well into summer to get all of this done.
Step 1: Clean
I used two different deck cleaners to scrub and strip down the deck. First, I used the all-in-one wood cleaner from Behr that we got at Home Depot.

I used a five gallon bucket and scrub bush to really scrub the cleaner into the wood before using my power washer to wash it off. This helped get much of the dirt removed.

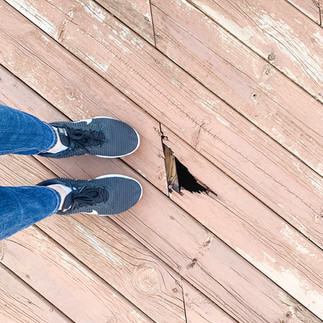
The deck was in pretty rough shape with lots of cracks, rough, splintery wood. You could still see the old paint that was on very thick even after an initial sanding from last year and cleaning.

Step 2: Strip the Paint
Next, I used a Behr paint stripper and repeated the same process.

(Editor's note... AKA Kiersten here. DO NOT use sandals when using this stuff. Follow the instructions on the bottle and wear proper clothing and protection to keep the paint stripper off of your skin or anything else you don't want it eating and discoloring. PS, I told him so.)

The wood stripper did a good job breaking up even more of the old paint.

Step 3: Sand
The next step was to sand the deck including the railings and steps. I bought a rotary hand sander last year that I really like, but this part took a long time. I’d highly recommend simply renting a floor sander to save yourself lots of time. (Kiersten wants to add she told me to do this but I found a lot of satisfaction doing it by hand.) The hand sander did its job and it started becoming very smooth and clean.

Plus, it was something the kids could help with.

Once finished it looked SO much better, but still had several cracks that made the floorboards rough. Remember in my head I was thinking of lots of kids walking on the deck barefoot from the swimming pool. I wanted every board as smooth as possible.

Step 4: Fill in Cracks
I used my putty knife with plastic wood filler and went over every crack, hole and rough patch I could find. My kids were even able to help me with this too.

This took a long time, but I continued to think about bare feet running on the deck.

Once finished I did one more full sanding job to smooth is all out and take away any rough patches. I went over all the spaces between the boards with a skinny filer to take any sticks or unnecessary nails out. I walked board by board barefoot and screwed or pounded in any nails that stuck out. At this point it looked like a pretty patched together deck. However, it was smooth and the cracks were filled.

Step 5: Paint
At one point after I got the deck fully sanded, Kiersten started to consider staining it instead of panting it. She wanted white railings and vertical boards with a darker stained floor. But then read about the benefits of sealing in decks more than 10 years old with paint to give more lifespan. Plus I don’t believe a stain was going to look very good after we did the wood filler so my wife decided to pick a solid color. Can you guess what color she picked? White! We went with a Behr waterproof full coverage stain and sealant for decks in Pinto White. It had a little bit of warmth to it so it wasn't stark white. Painting everything the same color made the project from here a lot easier and quicker.

We waited for the weather to have four solid days of sun to dry out the deck enough to paint and then to allow the paint to dry. For my first time I used a paint sprayer. I’m pretty sure once you use a spray gun, compared to hand painting, you never go back. We used the same sprayer Kiersten used when she painted the deck furniture last year. It worked really well and gave it a very smooth looking coat.
I first taped along the edges and the house. I should have taped plastic even farther because with the wind it did put some drops on the house. I did all the railing and edges first, and then sprayed along the boards.

Spraying with a paint sprayer is actually pretty relaxing. I’d highly recommend it for a deck because it also coated the edges of each board really well. I was a little worried about covering up the previous red paint in spots on the edge because even a sander couldn’t reach very easy. We wanted to do this project now before the pool project because we didn't have to worry about spraying on the dirt around the deck.

Kiersten originally bought 2 gallons, but we ran through that with the first coat. So I bought a 5-gallon bucket for finishing it off and to keep any excess. I repeated the same process twenty-four hours later and it was completely covered. I think we ended up using about 4 gallons.

It turned out great and saved us lots of money by refinishing to extend the life of the deck, instead of building a brand-new deck.

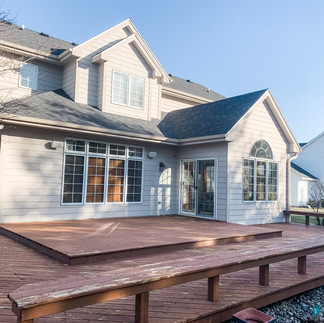
The Finished Deck
I'm super proud of how it turned out. It looks great and feels great underfoot.

If I, did it over again, I would have rented a big floor sander which would have saved time and my body.

The spray gun was well worth the purchase and the second day it only took me forty minutes to do the entire second coat of paint.

We will find out over the next year or so how white paint holds up with dirt and wet feet. Will likely be a mud problem at least until the pool project is done and there is concrete surrounding the deck.

The good news is nobody will be getting any slivers from walking on the deck!

Need a deck fix? Here's what we used:
Behr All-in-one Wood Cleaner from Home Depot
Behr Wood Stain and Finish Stripper from Home Depot
Behr Solid Color Waterproofing Exterior Stain and Sealer in Pinto White from Home Depot
Tools for the job:
Electric High Power Washer affiliate
Deck Scrub Brush affiliate
Random Orbit Sander, 5-Inch affiliate
Sanding pads affiliate
Dewalt drill affiliate
Paint Sprayer affiliate
Painters Tape affiliate
Husky hammer affiliate
Steel File affiliate
Putty knife affiliate
Wood filler affiliate
DISCLAIMER: This post contains affiliate links, which means that if you make a purchase through one of the product links, we may receive a small commission at no extra cost to you. Thank you for your support!
